雪花 id 是一个 64bit 的 long 型 id。
snowflake 是 Twitter 开源的分布式 ID 生成算法,结果是 64bit 的 Long 类型的 ID,有着全局唯一和有序递增的特点。

- 最高位是符号位,因为生成的 ID 总是正数,始终为 0,不可用。
- 41 位的时间序列,精确到毫秒级,41 位的长度可以使用 69 年。时间位还有一个很重要的作用是可以根据时间进行排序。
- 10 位的机器标识,10 位的长度最多支持部署 1024 个节点。
- 12 位的计数序列号,序列号即一系列的自增 ID,可以支持同一节点同一毫秒生成多个 ID 序号,12 位的计数序列号支持每个节点每毫秒产生 4096 个 ID 序号。
今天我们来探究下 2 种常用 jar 包里面的 snowflake 的实现差异。
除了标准实现有很多种实现方式,不同方式的实现有不同的差异,主要体现在时间、数据中心、workId、sequence 的 4 段长度差异上。
生成雪花 id
号段分配
Mybatis-plus
mybatis-plus 自带了 IdentifierGenerator 的接口,提供了 ImadcnIdentifierGenerator 和 DefaultIdentifierGenerator 两种实现。
其中 DefaultIdentifierGenerator 是大多数情况的默认实现。
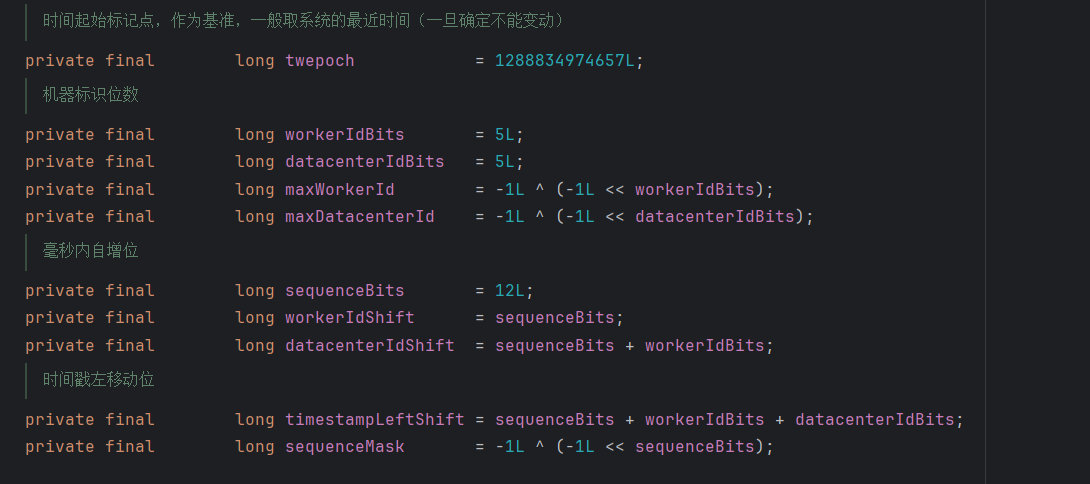
mybatis-plus 的实现与原版实现相比加入了 datacenterId 的概念,而且也引入了基准时间 1288834974657L;
| 标志位 |
时间 |
datacenterId |
workId |
sequence |
| 1 |
41 |
5 |
5 |
12 |
Sharding-jdbc
sharding 的实现类叫做:SnowflakeShardingKeyGenerator
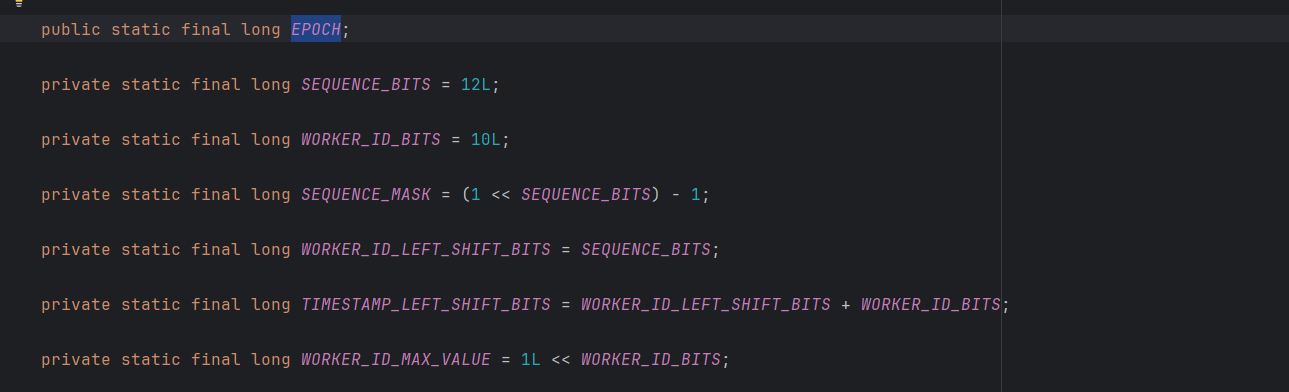
sharding 的实现与原版实现相比没有特别差异,而且基准时间也有差异
| 标志位 |
时间 |
workId |
sequence |
| 1 |
41 |
10 |
12 |
生成逻辑差异
Mybatis-plus
1
2
3
4
5
6
7
8
9
10
11
12
13
14
15
16
17
18
19
20
21
22
23
24
25
26
27
28
29
30
31
32
33
34
35
36
37
38
39
40
| public synchronized long nextId() {
long timestamp = timeGen();
if (timestamp < lastTimestamp) {
long offset = lastTimestamp - timestamp;
if (offset <= 5) {
try {
wait(offset << 1);
timestamp = timeGen();
if (timestamp < lastTimestamp) {
throw new RuntimeException(String.format("Clock moved backwards. Refusing to generate id for %d milliseconds", offset));
}
} catch (Exception e) {
throw new RuntimeException(e);
}
} else {
throw new RuntimeException(String.format("Clock moved backwards. Refusing to generate id for %d milliseconds", offset));
}
}
if (lastTimestamp == timestamp) {
sequence = (sequence + 1) & sequenceMask;
if (sequence == 0) {
timestamp = tilNextMillis(lastTimestamp);
}
} else {
sequence = ThreadLocalRandom.current().nextLong(1, 3);
}
lastTimestamp = timestamp;
return ((timestamp - twepoch) << timestampLeftShift)
| (datacenterId << datacenterIdShift)
| (workerId << workerIdShift)
| sequence;
}
|
最有一部分要记住,反解析时需使用。
生成几个 id 看看:参数 = datacenterId=22&workId=11&count=10
1
2
3
4
5
6
7
8
9
10
| 1722086321019465730,
1722086321019465731,
1722086321019465732,
1722086321019465733,
1722086321019465734,
1722086321019465735,
1722086321019465736,
1722086321019465737,
1722086321019465738,
1722086321019465739
|
Sharding-jdbc
直接看代码:
1
2
3
4
5
6
7
8
9
10
11
12
13
14
15
16
17
| @Override
public synchronized Comparable<?> generateKey() {
long currentMilliseconds = timeService.getCurrentMillis();
if (waitTolerateTimeDifferenceIfNeed(currentMilliseconds)) {
currentMilliseconds = timeService.getCurrentMillis();
}
if (lastMilliseconds == currentMilliseconds) {
if (0L == (sequence = (sequence + 1) & SEQUENCE_MASK)) {
currentMilliseconds = waitUntilNextTime(currentMilliseconds);
}
} else {
vibrateSequenceOffset();
sequence = sequenceOffset;
}
lastMilliseconds = currentMilliseconds;
return ((currentMilliseconds - EPOCH) << TIMESTAMP_LEFT_SHIFT_BITS) | (getWorkerId() << WORKER_ID_LEFT_SHIFT_BITS) | sequence;
}
|
核心在于最后一行,((currentMilliseconds - EPOCH) << TIMESTAMP_LEFT_SHIFT_BITS) | (getWorkerId() << WORKER_ID_LEFT_SHIFT_BITS) | sequence; 这个要记住,反解析时要用到。
生成几个 id 看看:workId=555&type=sharding&count=10
1
2
3
4
5
6
7
8
9
10
| 928955622318321665,
928955622318321666,
928955622318321667,
928955622318321668,
928955622318321669,
928955622318321670,
928955622318321671,
928955622318321672,
928955622318321673,
928955622318321674
|
反解析
Mybatis-plus
反解析就是把生成的逻辑反过来,按照号段分配逻辑,按位解析,注意:时间因为有基准时间,所以必须反向加减。
1
2
3
4
5
6
7
8
9
10
11
12
13
14
15
16
17
18
19
20
21
22
23
24
25
26
27
28
29
30
31
32
33
34
35
36
37
38
39
40
41
42
43
| private void buildMybatis(Map<String, Object> res, String sonwFlakeId) {
final long twepoch = 1288834974657L;
final long workerIdBits = 5L;
final long datacenterIdBits = 5L;
final long sequenceBits = 12L;
final long workerIdShift = sequenceBits;
final long datacenterIdShift = sequenceBits + workerIdBits;
final long timestampLeftShift = sequenceBits + workerIdBits + datacenterIdBits;
Map<String, Object> mybatisMap = new HashMap<>();
res.put("mybatis-plus", mybatisMap);
int len = sonwFlakeId.length();
int sequenceStart = (int) (len < workerIdShift ? 0 : len - workerIdShift);
int workerStart = (int) (len < datacenterIdShift ? 0 : len - datacenterIdShift);
int timeStart = (int) (len < timestampLeftShift ? 0 : len - timestampLeftShift);
String sequence = sonwFlakeId.substring(sequenceStart, len);
String workerId =
sequenceStart == 0 ? "0" : sonwFlakeId.substring(workerStart, sequenceStart);
String dataCenterId =
workerStart == 0 ? "0" : sonwFlakeId.substring(timeStart, workerStart);
String time = timeStart == 0 ? "0" : sonwFlakeId.substring(0, timeStart);
int sequenceInt = Integer.valueOf(sequence, 2);
mybatisMap.put("sequence", sequenceInt);
int workerIdInt = Integer.valueOf(workerId, 2);
mybatisMap.put("workerId", workerIdInt);
int dataCenterIdInt = Integer.valueOf(dataCenterId, 2);
mybatisMap.put("dataCenter", dataCenterIdInt);
long diffTime = Long.parseLong(time, 2);
long timeLong = diffTime + twepoch;
String date = DateFormatUtils.format(timeLong, "yyyy-MM-dd HH:mm:ss");
mybatisMap.put("date", date);
}
|
运行结果:1722086321019465730 的解析结果:
1
2
3
4
| "date": "2023-11-08 10:59:08",
"sequence": 2,
"workerId": 11,
"dataCenter": 22
|
1722086321019465731 的解析结果:
1
2
3
4
| "date": "2023-11-08 10:59:08",
"sequence": 3,
"workerId": 11,
"dataCenter": 22
|
Sharding-jdbc
1
2
3
4
5
6
7
8
9
10
11
12
13
14
15
16
17
18
19
20
21
22
23
24
25
26
27
28
29
30
31
| private void buildShardingJdbc(Map<String, Object> res, String sonwFlakeId) {
final long SEQUENCE_BITS = 12L;
final long WORKER_ID_BITS = 10L;
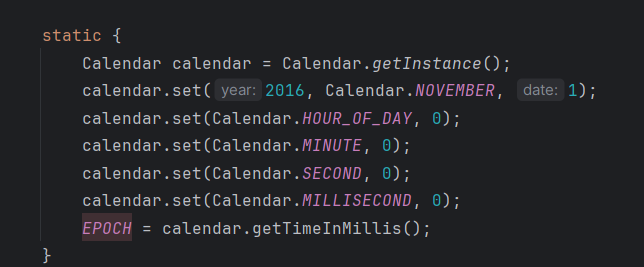
Calendar calendar = Calendar.getInstance();
calendar.set(2016, Calendar.NOVEMBER, 1);
calendar.set(Calendar.HOUR_OF_DAY, 0);
calendar.set(Calendar.MINUTE, 0);
calendar.set(Calendar.SECOND, 0);
calendar.set(Calendar.MILLISECOND, 0);
Long EPOCH = calendar.getTimeInMillis();
final long WORKER_ID_LEFT_SHIFT_BITS = SEQUENCE_BITS;
final long TIMESTAMP_LEFT_SHIFT_BITS = WORKER_ID_LEFT_SHIFT_BITS + WORKER_ID_BITS;
Map<String, Object> dataMap = new HashMap<>();
res.put("sharding-jdbc", dataMap);
int len = sonwFlakeId.length();
int sequenceStart = (int) (len < SEQUENCE_BITS ? 0 : len - SEQUENCE_BITS);
int workerStart = (int) (len < TIMESTAMP_LEFT_SHIFT_BITS ? 0
: len - TIMESTAMP_LEFT_SHIFT_BITS);
String sequence = sonwFlakeId.substring(sequenceStart, len);
String workerId =
sequenceStart == 0 ? "0" : sonwFlakeId.substring(workerStart, sequenceStart);
String time = workerStart == 0 ? "0" : sonwFlakeId.substring(0, workerStart);
int sequenceInt = Integer.valueOf(sequence, 2);
dataMap.put("sequence", sequenceInt);
int workerIdInt = Integer.valueOf(workerId, 2);
dataMap.put("workerId", workerIdInt);
long diffTime = Long.parseLong(time, 2);
long timeLong = diffTime + EPOCH;
String date = DateFormatUtils.format(timeLong, "yyyy-MM-dd HH:mm:ss");
dataMap.put("date", date);
}
|
解析结果:928955622318321665
1
2
3
| "date": "2023-11-08 10:17:59",
"sequence": 1,
"workerId": 555
|
928955622318321666
1
2
3
| "date": "2023-11-08 10:17:59",
"sequence": 2,
"workerId": 555
|
总结
经过上面的反解析可以发现 1 个隐藏规律:
mybatis-plus 生成的 id 是以 1 开头的,而 sharding-jdbc 生成的是以 9 开头的,原因在于 2 个的时间基础不同。